Configuration of Mozilla Thunderbird
Images may vary slightly from platform to platform (these images
were captured on Linux, using Thunderbird 68.7.0. There can be both
cosmetic and substantive navigation differences on other
platforms).
You can obtain a copy of Mozilla Thunderbird at http://www.mozilla.com/thunderbird/.
|
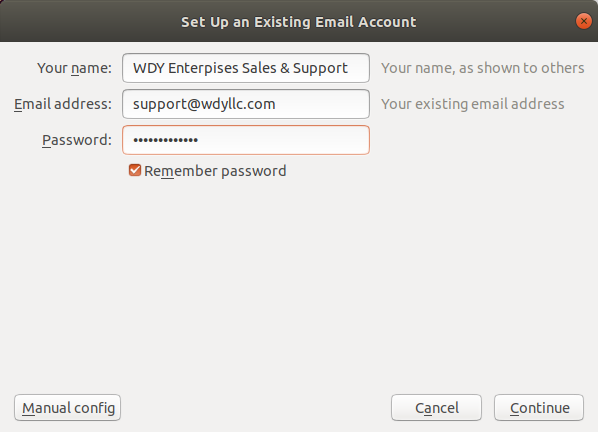
1. Setting your identity
On a fresh install of Thunderbird, you'll just end up here; if you're adding a new account, you may need to visit "Account Settings" in Thunderbird, and tell it to "Add Mail Account"
Put in the name you want
to put on your outgoing email, your correct email address, and password, and
click on the "Continue" button.
|  |
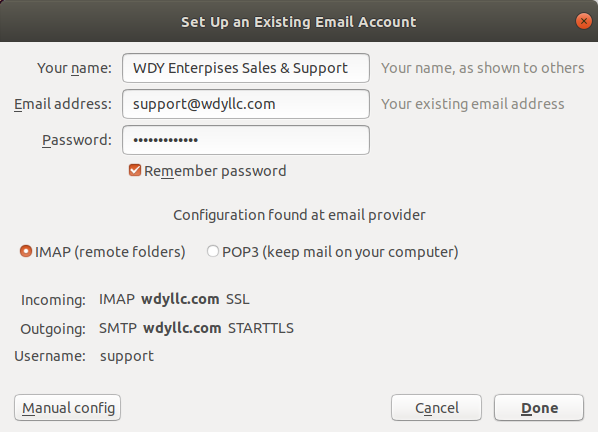
2a. Set Up an Existing Email Account with autoconfiguration
Thunderbird will automatically determine your configuration and
pre-populate the config screen when:
- your email address is at a WDYLLC-owned-and-operated domains (such as GCFN.ORG), and
- you're not using email associated with a privately owned domain name with hosted autoconfiguration, and
- you're connected to the Internet, and
- you haven't made any typos in your email address
Select POP3 or IMAP mail (your preference) and click "Done"... and
your email will begin flowing momentarily.
Please note that we offer both POP3 (keep mail on your computer)
and IMAP (remote folders) incoming email services. Deciding whether to use POP3 or IMAP can be a
complex question to answer. It really depends on your usage patterns,
how many and what types of devices you use, and your email deletion
habits. Just keep in mind that the use of IMAP without routine email
cleanup hygiene on your part is likely to result in lost or
misdirected e-mail.
|
 |
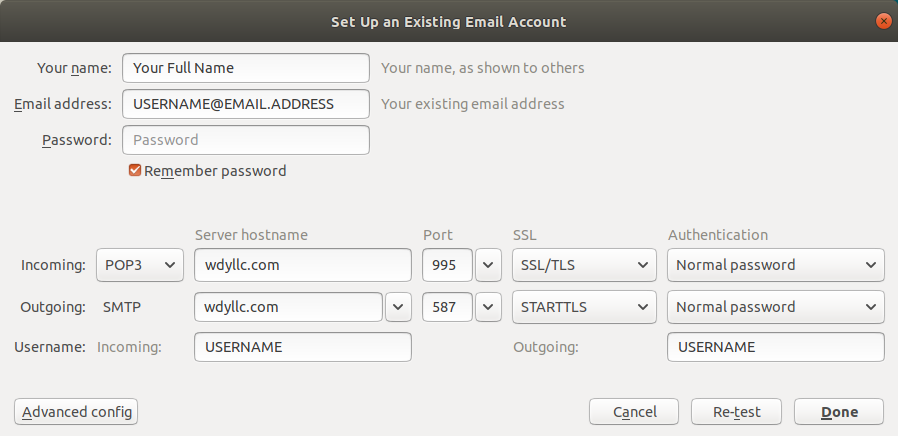
2b. Set Up an Existing Email Account for POP3 access without autoconfiguration
If autoconfiguration does not occur and you want to use POP3, you can enter
the configuration manually instead.
You'll need to populate a the configuration boxes, as shown in the
image (right). For POP3 access, you'll need to do the following:
- For incoming mail::
- Use the pulldown to select 'POP3',
- Set incoming server hostname to 'wdyllc.com',
- Set incoming port to '995',
- Set SSL mode to 'SSL/TLS',
- Set Authentication SSL to 'Normal password',
- For outgoing mail:
- Set incoming server hostname to 'wdyllc.com',
- Set incoming port to '587',
- Set SSL mode to 'STARTTLS',
- Set Authentication SSL to 'Normal password',
- set both the incoming and outgoing username fields to your
username. Remember, your username is the word to the left of the @
symbol in your e-mail address; if your e-mail address is
USERNAME@EMAIL.DOMAIN, then your username is USERNAME.
|
 |
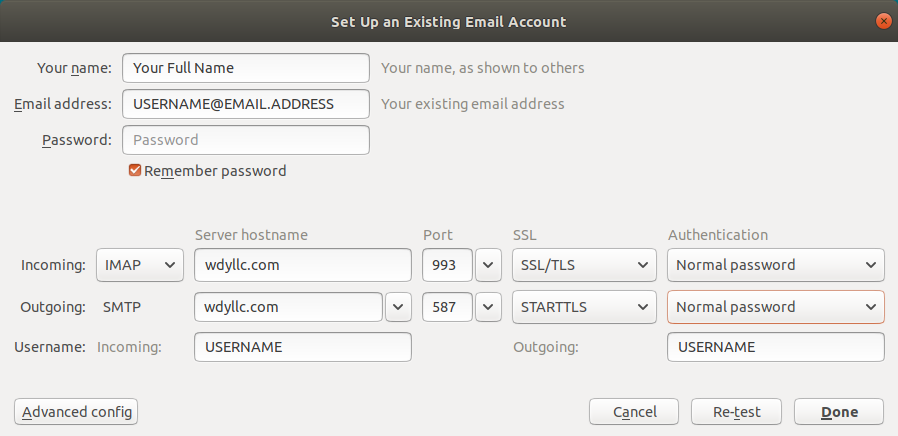
2c. Set Up an Existing Email Account for IMAP access without autoconfiguration
If autoconfiguration does not occur and you want to use IMAP, you can enter
the configuration manually instead.
You'll need to populate a the configuration boxes, as shown in the
image (right). For IMAP access, you'll need to do the following:
- For incoming mail::
- Use the pulldown to select 'IMAP',
- Set incoming server hostname to 'wdyllc.com',
- Set incoming port to '993',
- Set SSL mode to 'SSL/TLS',
- Set Authentication SSL to 'Normal password',
- For outgoing mail:
- Set incoming server hostname to 'wdyllc.com',
- Set incoming port to '587',
- Set SSL mode to 'STARTTLS',
- Set Authentication SSL to 'Normal password',
- set both the incoming and outgoing username fields to your
username. Remember, your username is the word to the left of the @
symbol in your e-mail address; if your e-mail address is
USERNAME@EMAIL.DOMAIN, then your username is USERNAME.
|
 |